Use The Gradient Mesh Tool to Create a Photorealistic Image
The Gradient Mesh tool is one of the lesser used tools in Adobe Illustrator, for some reason people seem to neglect its capabilities. I cant count how many times I would stumble onto an illustration and think it was a photograph, and I’ll be the first to admit that I never knew what the tool was. Thinking back to my early days of college, I would get frustrated that I had mastered Adobe Illustrator, but I still didn’t know how to properly use the Gradient Mesh tool. Maybe I was afraid of it? The tool is a little intimidating to learn, but with some a lot of patience, you too can master the tool.
Every time I attempted to use this tool, I kept remembering why I never use it. Its hard to master, its complicated, and its time consuming. Yet, every time I sat down and said to myself “todays the day I master this damn tool” I would make it half way and stop because the results were…lets just say…not photorealistic. Well, in this tutorial I will show you all a very easy way to master this tool!
PREPARATION
The things we are going to need is Adobe Illustrator, preferably CS5, and any image that you wish to recreate with photorealism. You will also need a fine eye for detail and patience.You can click below to download the F-35 jet image that I am using or use your own.

STEP 1
The first thing you want to do is put your image on the bottom layer and lock it. After you do that, create a new layer above the locked layer. You should double click on the layer and name it L_Rear for left rear. Before you hit OK, change the color to something that will be easily viewable, I like to use gold because it shows when it is above light or dark colors.
STEP 2
Next we want to zoom in to the left rear wing. You want to be close enough that you can see all the details, but you can see the entire wing at the same time. Now press M to equip the rectangle tool, then make a general shape around the wing.
STEP 3
Now grab the mesh tool or press U for the shortcut. This is the trickiest part, all of your work will depend on this part, it is the foundation. Even so, its not that hard once you get the hang of it.
Start by command clicking the eye next to the layer you are working on. This will make that layer appear in outline mode so you can work without you view being blocked. Next, with the mesh tool selected, click once on any of the vertical lines of the rectangle. This should make one horizontal line dividing the box.
Then select the Direct Selection tool, or press the A button. This is when you can start manipulating the shape of the rectangle. Your goal is to “trace” the shape with the rectangle. You should always start with as few lines as possible so just move the two center points in and start moving the corner points. It doesn’t have to be perfect right now.
To really get a tight shape you need to manipulate the anchor points. By using the Direct Selection tool, you can grab the handles to straighten out all the shapes. This will give you straight lines and tight corners.
Now start bringing in the rest of the points to meet the edges of the wing. You will notice that eventually you will get to a point where you cannot bring the line any closer without messing up the rest of the points. This is where you start putting in additional lines. Just like before, click the middle of where you need the line and then start manipulating it. Its that easy!
This is where you can be liberal as possible. You need the rectangle to conform to the shape of the wing so start adding line by line. Each time you add a line you need to correct all the handles and reshape them so they do not do a zig zag. Zig zags are bad when working with the Gradient Mesh. Every detail you see, add a point to form it.
STEP 4
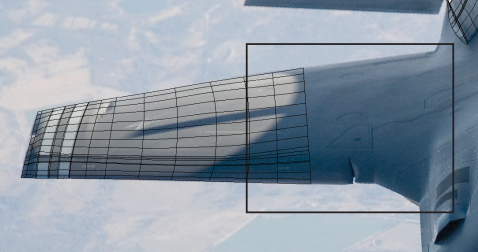
This is what your wing should look like with all the lines added on. Remember that for more detail, you need more lines. Don’t forget to add some vertical lines in there too. I didn’t add many lines towards the top of the wing because there isn’t many details, but at the bottom there is, which is why there are more lines. Also, don’t forget that overall, this shape is rounded, so you need to adjust your handles to be rounded.
STEP 5
Now for another tedious step. Again, make sure that your layer is in outline mode by cmd clicking the eye. Once you have your shape finalized, you will be using the Direct Selection tool (A) and the Eye Dropper tool (I). I would highly recommend using the keyboard shortcuts because you will be using them a lot.
OK, now find a comfy position because this might take a while depending on the complexity of the shape. Zoom in extremely close to the mesh outline and simply select a point. Now press (I) and take the Eye dropper to select directly under that point. You now have made that point the color that it is on top of. command click the layer eye to see if it worked.

A really good tip to help you get the details perfect is that the closer the lines are together, the sharper the lines of the color will be. That is because each line stops at the next. So a wide open point like the one I just showed you will spread outward to the next lines. That means if you have a really sharp detail that needs to end abruptly, just create a line right NEXT to it. That way it will stop where you want it. Notice how close some of my lines are, that is because I want the color to stop.
You might also notice that once you preview your finished piece that there might be a few stray colors or blemishes. This is because you are picking up different colors from the photograph. Simply click that point and grab the Eye Dropper, then select a color in proximity so that it blends evenly.
STEP 6
Finish coloring in each point, get comfy and toggle between the two tools. Remember to be working in outline mode so you can get the exact colors. If you need more points and details, you can add them with the Mesh tool as you go.
This is what the final wing should look like. See? It wasn’t so hard. It might not look like much on its own, but once you start blocking in the rest, everything really pulls together. You just need to do it piece by piece. When I started doing this I made the mistake of making all my original shapes too big, trying to fit too much into it. When in doubt, make it a new shape.
STEP 7
Now you need to finish the rest of the Jet, or whatever you are making. I wont walk you thought each piece but I will do a quick overview of another larger section to make sure you know what you are doing. I will be making the left wing, so make a new layer and name it accordingly. This wing will be made up of three shapes.
First, I will do the highlighted part that is not in the shadow. Simply block an outline around the shape. Then, make one single mesh point going down the center, vertically.
Start shaping the section to trace the wing. It is okay that it overlaps into the shadow part, this will come in handy later when we are trying to blend all the pieces together. Now start adding in all the detail by adding more and more lines. Remember to fix all the handles to conform to the shape of the wing.
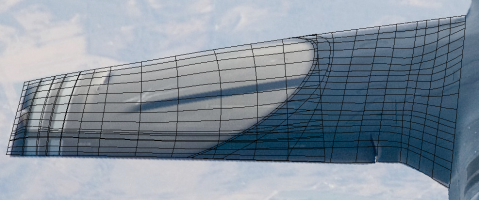
This is what the finished details should look like. Notice how it extends past the shadow. If you do not do this, then there will be obvious lines inbetween each shape. By doing this the points will blend making it seamless. Now do the same exact thing for the two shadows.
TIP
If you ever have two shapes that need to be blended, as in not have an abrupt line like the wing above, just grab the two closest points of both respecting object and choose the same color. This will ensure even blending between multiple shapes.
CONCLUSION
These are just a few pieces of a greater image, but hopefully I have given you enough to follow through and finish the Jet or whatever it is that you chose to work with. These techniques will literally work for EVERY image you would ever want to Gradient Mesh, all you have to have is a fine eye for detail, patience, and create many lines. Below are a couple examples on how I used the Gradient Mesh tool, I hope you found this tutorial useful!
How did your Gradient Mesh come out? Post below for us to see!


